Tuesday, May 5, 2015

Repairing That Old Fence Post


     If you have a rotten fence post you may be hesitant on what exactly replacing it might entail.  Fortunately, it’s not that complicated.  Before you get started know this, you will break a sweat and it will help to have an extra set of hands. The sooner you get to it the sooner you’ll be done and on with your Saturday activities in no time.

Some of the things you will need for this project:
  • A Sledgehammer
  • Safety Glasses
  • Concrete Mix
  • A Big Bucket
  • A New Matching Fence Post

     First you need safety glasses and a sledgehammer.  Sounds fun already, right?  You will also need a shovel and some gloves.  You want to dig a hole around one half of the post around concrete base and just as deep.  You’ll need to dig it wide enough so that you can comfortably swing a sledgehammer at the concrete block.  Once you break away about half of the concrete you and your helper should be able to pull the post out.  If the post breaks during your sledgehammer wielding, you can tie a rope around the pier to pull the rest of it out.

     Now, set your new post so that it is less likely to rot.  After you mix the concrete in a big bucket following the instructions on the bag, you want to pour your concrete so that it extends a few inches above the grass.  Taper you concrete so that rain is directed away from the post and into the ground.  If you’re worried about the aesthetics of the concrete over the function, you can always go back and paint the base green once it has set. 

     If you’re unhappy with a newly replaced post alongside your old dirty fence, use the whole weekend and make it a fence restoration project!  Power wash. Stain. Fence like new.  Be sure to pick the right pressure and  spray tip so that you don’t split the wood.  Discontinue spraying when no more color change occurs on your fence.  Power washing will roughen up the grain of the wood, but that will allow your stain and sealant to thoroughly penetrate the surface.  Use a roller to coat your fence, but then use a brush to move the stain to the corners and push the stain further into the wood, eliminating drips.


     Fence post replacement isn’t a long job, but it does take muscle, and renewing the finish of your fence isn’t a tough job, but it takes a little time and patience.  With the right team, you’ll be done by the weekend!

Thursday, April 30, 2015

We're Here for YOUR Emergency Home Repairs in Richmond, VA.


When you own a home or even just rent one, having someone to come and help you out immediately shouldn't add to the stress of going through a home emergency situation. In fact, there isn't a lot of companies that will do it without charging you an exorbitant amount of money. We get it, emergencies happen and we're here to help!

It doesn't matter if you need repairs due to: weather, water, tree or fire damage. Please call New Earth anytime 24 hours a day.  We are experienced with protecting our customers assets from further damage, estimating and working with insurance companies during the repair project process.

Some of our other emergency services include: water damage mitigation, fire and smoke damage, mold and biohazard remediation, board-up and tarping services, complete reconstruction, regional catastrophe response and mitigation services, and much more in Richmond, Virginia and surrounding areas. New Earth provides emergency services around the clock.

New Earth provides quick and efficient service for residential, commercial and industrial properties.  Rapid response helps to prevent a bad situation from getting worse. We also work with insurance companies because we know it can be overwhelming especially in time of crisis.  Please allow us the opportunity to help you navigate these waters.

New Earth VA Llc is a leader in the disaster restoration industry! With our around the clock emergency service we're ready to dispatch a crew in a moment’s notice, we are able to handle any emergency that may arise. New Earth VA has many years of experience in the disaster restoration industry and has ensured the proper repairs to countless families during the reconstruction of their homes. If the unthinkable should happen to you and yours, know that you can count on New Earth VA and our exceptional service to assist you in every step of the way, from the emergency service to reconstruction.


Tuesday, April 28, 2015

The Best Ways To Use Painter’s Tape


Giving your home a modern pop of color is one of the best ways to update your decor for the spring!  If you’re just painting accent walls or doing a more complicated color block pattern, painters tape is an essential tool in your arsenal.  Here’s a few tips on how to master the skill of perfect lines for your next painting project.

Make Sure Your Molding is Dust Free
     Using a damp rag on your molding can get rid of surface grime that will prevent your painters tape from sticking as well as it could.  It can also prevent any unwanted textures by not immortalizing dust in your paint job!  If you’re doing a project in your kitchen, using a mild detergent will help dissolve any grease that has popped from your stove onto the walls over time.  Wait for your newly cleaned surfaces to dry before applying the tape.

Use a Handy Tape Applicator
     You know the frustration you experience when trying to pull out a piece of cellophane to cover leftovers and it sticks to itself?  Using long, continuous pieces of tape can have that same effect!  However, you really do want to use long pieces of tape so that your straight line of paint has as much continuity as possible.  How to achieve that without the frustration in a fast and simple way is using a tape applicator.  It’s designed for precision by using the adjacent surface as a guide and has a built in tape cutter.  They’re available at most home centers along with the roll of tape. 

Seal the Tape
     Prevent any paint from seeping under the tape by using a flexible putty knife to press down on the edge.  Start from one end and apply downward pressure along the length of your tape line, tilting your tool slightly towards the edge directly next to the surface you’re painting.  This step ensures crisp, clean lines.

Protect Your Other Walls
     This is especially important if you’re painting the ceiling or having younger ones help with the paint project. Using lightweight plastic to cover your walls while painting the ceiling will help prevent roller splatter from inadvertently making it onto other surfaces.  The trick to hanging it is using a wider tape.  Press the top part of the tape as explained above and leave the bottom half un-stuck.  Hang your lightweight plastic by pressing it against the curled up edge of your tape.  Overlap your plastic sheets at doorways for openings.

Cut the Corners
     The trick to getting corners just right is by running the first piece of tape up the wall.  Use your edge flattening tool to press the tape firmly into the corner, then use a utility knife to remove the excess on the wall. That way, the next piece of tape you apply doesn’t have to so perfect.  This same trick can be used when taping off window glass to paint the trimming.

Protect Your Floors
     Whether you have carpet or wood flooring, you don’t want drops of paint on either!  While using drop cloths helps deal with that, they can move on you while working your way through an area.  Use masking paper along with your painters tape at the baseboards and it will give you the freedom to move your drop cloths from one side of the room to the other without worrying that they remain perfectly against the wall.  You can protect door molding from roller splatter using masking paper as well.

Make sure your using the proper tools when considering your next paint project.  Remember, not all painters tape is equal and using the right one for the job is important to get the results you want.  While it’s best to remove painters tape while the paint is still wet, most water based paints dry quickly, or you may not have time to apply a second coat in one day.  Tearing away your painters tape on a semi-dry wall can potentially pull the paint away with the tape.  So, if you can’t pull off the tape right away, wait until your wall is fully dry and use a putty knife to break the seal between the paint and the tape.  Always pull the tape away at a 45 degree angle to the wall.


Thursday, April 23, 2015

Beginner To Advanced Tips From The Carpentry Pros


There are lots of small home repairs that you want to be able to do yourself without hiring a contractor.  For all those weekend projects, we’ve outlined a few carpentry tips that only experience can bring. The more you practice, the better you will perfect your home DIY skills.  

     Beginner
1.    Make sure you write your measurements down.  I know a lot of people are saying “duh!”  But those are the same people who say “Duh, I can remember 5 and 3/8 inches” and accidentally cut 3 and 5/8 inches.”  It’s the simplest thing you can do to ensure your success.  Measure twice and write it down!  Throw some masking tape on your measuring tool to make it that much easier to jot down.
2.     Use a pencil whenever you can instead of your measuring tape.  Not only can it be faster, but making a mark on the lumber you’re planning on cutting can be the most precise.
3.     Having the best all around hammer can make your life easier.  Lots of people have different opinions on this, but a smooth-faced, 20 ouncer with a straight claw can do most any job.  The straight claw is a much better shape for removing nails.

     Intermediate
1.     If you’re doing projects like adding interior trim, an air powered trim gun can give your project faster and more accurate results.  You won’t be burdened by hitting the nail precisely every time while not knocking your trim out of place.  Plus it only gives you tiny little holes to fill in!
2.     When you’re building a deck, use the construction lumber as a template!  You don’t need an elaborate strings and stakes set up to guide you.  Use the construction lumber to outline the structure by roughly tacking it together, move it aside to dig the posts and put it back to set the posts.  Easy.
3.     Use what you already have lying around to make a miter saw bench for your project.  Not only does it double as a super convenient work surface, but you won’t have to kneel or hunch to make your cuts.  Often times means more accurate and easier cuts.

     Advanced
1.     No matter how advanced you are, getting the perfect miter cut can be tricky.  Use a test piece first!  Use smaller pieces to achieve the perfect miter angle, then cut the real thing.
2.     Estimate framing materials for walls using this formula: One stud for each foot of wall.  Five feet of plate material (bottoms, tops and ties) for each foot of wall.  Yes, it’s going to seem like a lot, but you’ll need it for windows, door frames, blocking and braces.  
3. Position your lumber using the toenail trick.  To adjust stubborn boards, drive a nail at an angle through the edge of a stud to coax it into place.
 

No matter what your skill level, remember that when it comes to carpentry for your home, practice makes perfect.  Of course you might make a few mistakes, but learning from them is crucial.  Hopefully some of these tips will help you with your next project!

Monday, April 13, 2015

#DIY Decor - Wall Mounted Coat Rack


     “Life hacks” are growing to immense popularity with tips and tricks on how to achieve kitchen and home bliss with half of the effort and usually, half the cost.  While Spring is the time of year you start thinking about home improvement projects, a grand undertaking might not always be in your budget.  Adding simple DIY decor around your home is a great way to bring a fresh, updated look without having to worry about breaking the bank.  Current trends include a mix of rustic with the modern, which means we’re seeing a lot of wood details combined with industrial style hardware. Add a few bright colors with perhaps some geometric designs to the mix and you’ve got something sleek and modern.  This is the perfect formula for a Do it Yourself venture.  Spend a weekend perusing your local thrift and hardware stores and you can find lots of treasures to incorporate these design elements in your home.

     One project we had a lot of fun on was putting together this rustic multi-purpose hanger.  Built with a solid piece of 100 year old Oak and adorning cast iron pegs as the hangers makes this a classic luxurious addition to an entryway or wet room.  While we have the access to this gorgeous material, it is just as easy to recreate at home using a few techniques.  Decide on the width and length you want your hanger to be for the space where you’re going to hang it.  Buying a piece of lumber at your local hardware store is cheap and they’ll cut it to the dimensions you want.  Use different sized sandpaper to experiment with the worn-in look you’re going for and stain it to match the rest of the room.  You may want to go over the dry stain with sandpaper again for an extra rustic feel.  You can find different sizes and shapes and colors of hangers that you like from a thrift store for an eclectic, whimsical look, or you can purchase matching hardware from your home store.  For an even homier feel, lots of times antique stores will have matching sets of beautiful hardware for an extra penny.

It’s a simple design, with lots of visual and functional payoff!  

Thursday, April 9, 2015

The Art of Building #Custom


Our favorite projects at New Earth include those that let us work with our hands. There is a very special connection between a person and a piece of wood, there is something very exceptional about working with something grown in nature. We like the idea of taking something like a fallen tree and repurposing it to make a beautiful dining table. Most of these pieces have to be custom ordered, not just because we like to build things to your own specifications but because we believe that has started to become a lost art. Here we share the process from beginning to end, on what it is like to build a dining room table.


Monday, April 6, 2015

Outdoor Living Done Right


     This time of year people start thinking about outdoor space.  You want to find more reasons to be outside than inside and who can blame you, Virginia is beautiful in the spring.  Building a space to live and entertain in the outdoors can range from installing a simple patio, to building a deck, to building a Florida Room addition.  Any one of these projects adds value to your home and can recoup the cost when you decide to sell.  Whether you’re keeping it simple or going big, here are the best elements of outdoor living that will make sure you get the most out of your outdoor space.

Location
  •   Now’s a good time to locate the sun in relation to your property.  Where will the sun be in the morning/afternoon/evening?  You want sun in your sunroom, so maybe the shady side of the house isn’t the best location.  The most ideal spot has sun exposure with some shade perhaps provided by a tree.
Multiple Uses
  •   You want your space to accommodate lots of different occasions.  Being able to fit a dining table as well as a seating arrangement can assure you get the most for your investment.  Not only can you enjoy meals or lounge in the cool breeze, it can double as a home office for mornings when you’d like to take your coffee al fresco.  
Decor
  •   Just because your room can be exposed to the elements, doesn’t mean your furniture needs to be plastic.  Upholstered seating, along with pillows, throws and a durable rug truly make the space double as a second living room.  Complete the effect with side tables and lamps, just make sure to include outlets into your design plans.  If you’re worried about sun damage to your furniture, adding privacy curtains can protect your fabric as well as prevent overheating.
    

     Making an addition to your living space can be such an exciting project as well as a sound investment.  As a transitional space between indoors and outdoors, pile it up with lots of potted plants and whimsy.  Have fun with it!  After all, it is supposed to be a space to relax, enjoy the scenery and entertain family and friends.

Thursday, April 2, 2015

Home Maintenance Checklist


We recently came across a really great list of things to check for every month. The source of this list is MyHomeIdeas.com. If you haven't checked out the site, you should - it's a great source of information.

MONTHLY
• Fire Extinguisher: Check that it's fully charged; recharge or replace if needed.
• Sink/Tub Stoppers and Drain Holes: Clean out debris.
• Garbage Disposal: Flush with hot water and baking soda.
• Water Softener: Check water softener salt drum and replinish salt if necessary.
• Forced-Air Heating System: Change filters once a month if user's manual recommends fiberglass filters.

EVERY 2 MONTHS
• Wall Furnace: Clean grills.
• Range Hood: Clean grease filter.

EVERY 3 MONTHS
• Faucet: Clean aerator.
• Tub Drain Assembly: Clean out debris; inspect rubber seal and replace if needed.
• Floor and Outdoor Drain Grates: Clean out debris.

EVERY 6 MONTHS
• Smoke Detector: Test batteries and replace if needed.
• Toilet: Check for leaks and water run-on.
• Interior Caulking: Inspect caulking around tubs, showers, and sinks; replace any if it is deteriorating.
• Forced-Air Heating System: Change semi-annually if user's mannual recommends high efficiency pleated or HEPA-style filters.
• Garbage Disposal: Tighten drain connections and fasteners.
• Clothes Washer: Clean water inlet filters; check hoses and replace them if they are leaking.
• Clothes Dryer: Vacuum lint from ducts and surrounding areas.
• Wiring: Check for frayed cords and wires; repair or replace them as needed.
• Range Hood: Wash fan blades and housing.

EVERY SPRING
• Roof: Inspect roof surface, flashing, eaves, and soffits; repair if needed.
• Gutters and Downspouts: Clean them out or install no-clean version. Inspect and repair weak areas; check for proper drainage and make repairs if needed.
• Siding: Inspect and clean siding and repair if needed.
• Exterior Caulking: Inspect caulking and replace any that is deteriorating.
• Windowsills, Doorsills, Thresholds: Fill cracks, caulk edges, repaint; replace if needed.
• Window and Door Screens: Clean screening and repair or replace if needed; tighten or repair any loose or damaged frames and repaint if needed; replace broken, worn, or missing hardware; tighten and lubricate door hinges and closers.

Visit the original article by clicking here. 

Tuesday, March 31, 2015

Restorations Project: Chandler Hall of William and Mary College Campus

Our most recent project that we are so proud of is the historical renovation of Chandler Hall on the William and Mary College Campus.  This was a huge undertaking.  The three story residential hall is named after William and Mary’s 19th president and houses 149 students.  It was originally built in 1931 and it was our job to recreate the original columns and install 160 historic replacement windows, complete with weighed sashes!  This was a large project that we were happy to do, and do it right!  It was our obligation to give such a grand historical project authentic and beautiful results, and I believe we succeeded.


Tuesday, March 24, 2015

Spring Cleaning Checklist


It's that time of year again, folks!  Time to get some chores done.  Keeping up with house maintenance is ever so important during seasonal traditions because with each season brings different potential problems.  Like they always say, an ounce of preventions is worth a pound of cure.
  
     One of the major things to check for in the spring is water damage.  The wintertime is when the water table rises.  The snow and rain is stored in the earth and isn’t being evaporated as quickly into the atmosphere as it does during the spring and summer.  So investigate your house from the bottom, up.  Check for moisture under the house, any condensation in your crawl spaces can mean things like ill-fitting access doors.  Moisture in your crawl space can cause damage to floor joists, it can seep into your insulation and breed an environment for all sorts of things you don’t want in your home like mold, and bugs.

     Next check your basement for moisture.  If you see water seeping through your concrete block walls, deterioration of your carpets or floors, condensation on joists, blistering or peeling of wall coverings or if the air in your basement is humid, you need to start searching for a remedy.  Begin by airing out your basement.  You need to find the source of the problem.  It could be groundwater seeping into a settling foundation, a ventilation problem, or even inadequate grading from the foundation outward.  There’s a laundry list of problems and solutions to keep moisture out of your basement.  If you haven’t finished your basement but are thinking about it, its a good idea to address any potential water problems before starting the project.

     Next you want to make sure your air and rainwater are flowing efficiently through your house.  Check the gutters to clear any blockages.  Now is a good time to open all the vents in your house to air them out before it gets too hot.  Make sure there isn’t any condensation in your vents, either.  Check your attic rafters for condensation as well, any changes in color can also be a sign of damage.
  
     Last but not least, checking your windows for any air leaks can save you money on your energy bills.  Move a lighter around your windows, if the flame flickers, you have a leak.


     Just taking a quick look around your house, you’ll be able to tell what kind of shape it's in.  If you do find water damage, don’t fret, there are plenty of inexpensive solutions to try first, such as DIY sealants from your home center.  The key is to find it before any major damage is done, so you won’t have to shell out the big bucks for major repairs.

Monday, November 24, 2014

Fall / Winter Projects - Bathroom Remodels


There’s no better time than the winter to turn your boring bathroom into a spa retreat. While replacing a faucet, re-grouting tile, or repainting are relatively easy for the do-it-yourselfer, more ambitious jobs like replacing the tub or adding tile floor might be better left to a professional.

While a complete remodel might be a bigger investment, it’s worth considering.

Many older homes were not built using mold-resistant drywall, so if you’re going to make an investment in upgrading your bathroom, that’s one of the best places to start. Knowing what’s going on behind the walls is important before making expensive updates.

There is also a lot of plumbing involved with replacing bathtubs, sinks and toilets, which requires an expert to ensure it’s done right. Once the walls are closed up, a small leak can go unnoticed for a long time, resulting in serious damage and possibly a complete remodel.

Our philosophy is that if you’re going to invest in a project, do it right the first time.

Saturday, November 22, 2014

Fall / Winter Projects - Classy Doors


With home improvement projects, sometimes it’s the things that are used the most that are noticed the least. Like all the doors in your home — in and out of rooms, to closets and utility rooms. But after a closer look, the scratches, cracks, old hinges and outdated style can be hard to miss.

Replacing interior doors is an affordable way to give your home an updated look versus an expensive remodel. Most of the homeowners that come to us are looking for doors that have a unique or more modern look than what they have.

There are a lot of options that many people might not even think about. For example, double doors are a much more functional and attractive alternative to sliding doors and bi-fold doors, while French-style doors can add natural light and architectural detail to a space.

A big thing with customers right now is not so much the door, but the hardware. Homeowners are choosing update hinges and doorknobs with more modern colors like brushed nickel or aged bronze.

While installing interior doors can be a job for do-it-yourselfers, it can quickly turn into a bigger job than expected, especially when replacing doors in older homes.

Most doors are not going to just fall into place. The jobs we do involve cutting, trimming and shaping the door to size, and sometimes replacing the molding.

We advice homeowners looking to replace interior doors is for them to do their homework, know their budget, and have an idea of what they like.

Friday, November 21, 2014

Fall / Winter Projects - Lighten Up the Room!


What better way to brighten and warm your spirits this winter than with new lights, lamps or ceiling fans. Not to mention it’s an easy and affordable way to update the style of any room.

We get a lot of customers during the winter who are shopping for new lights to get ready for the holidays or to accent kitchen and bathroom renovations. They are also looking to save on their energy bill with ceiling fans which push heat back down.

LED-style lights, which come in contemporary and bold styles, also provide a money-saving option. Installing dimmers in areas like the family room or dining room saves money, while allowing homeowners to customize the ambiance.

In addition to pendant lighting, another style that is growing in popularity is Steampunk, which is a cross between vintage and industrial designs. But for a softer more romantic feel, a crystal chandelier is still a timeless choice.

When it comes to installation and dealing with electrical issues my advice is to hire a professional so you know it’s done right. Especially with ceiling fans, you want to be sure they aren’t loose or wobbly.

Thursday, November 20, 2014

Fall / Winter Projects - Give Your Kitchen A Splash of Personality!


For homeowners looking to spice up their kitchen without spending a pretty penny, adding a backsplash is a great solution, not to mention the perfect project for a cold winter weekend.

For several hundred dollars you can completely change the look of your kitchen, as well as customize it to fit your personality. Place like Home Depot offer classes to show you how you can easily do this yourself.

Just a few years ago The Home Depot had only about 40 tiles to choose from. Today, the store has more than 400 different styles and sizes, ranging from classic subway tile to natural stone to metal. While adding more functionality to a kitchen, a backsplash can also help accessorize and emphasize countertops, cabinets and appliances.

Installation is a relatively simple process, but it is very tedious and time intensive, we recommend making it a weekend project. Home Depot offer products like the Simple Mat and peel and stick tiles that save time and eliminate a lot of the mess.

Two pitfalls we warn you do-it-yourselfers about are not taking the time to prep and lay out a template which can result in irregular lines or spaces. And not cleaning off the grout completely, which once dry can result in a nasty haze that is almost impossible to get off.

Wednesday, November 12, 2014

Your Business Competition Isn't Competition At All - Business 101


Many of us who have their own business or company are always trying to think of ways we can get our name out there and get more clients. We sometimes feel a little threatened when we encounter someone who does the same type of work that we do. Our natural instinct is to find out what they are all about and figure out the things we do better, we’d like to think that no one does what we do but we all know that is far from the truth. 

In my many years of being the construction industry I have worked very hard to build my portfolio and set of skills. At New Earth we are particularly passionate about building and repurposing furniture. We have a saw mill on location in which we build all sorts of things like: tables, armoires, closets - you name it and we do it! That however doesn’t mean we have mastered all every single building skill there is out there. We all have our strengths and weaknesses and as a successful business we realized very quickly that we weren’t perfect. 

Our competition may have a better set of skills with certain things in which we may not as experienced or don’t have the tools to do. In our many years in business we’ve realized that some people perform better than we do in certain areas and that we can a lot of the times offer something that someone else can’t. We’ve built a network of business in which we relay work when we are not able to take it on ourselves. This keeps the integrity of our business and instead of helping us build enemies we build a friendly network of contractors that refer business back to us. Think of it as free advertisement and a way for people to talk about you through word of mouth in a positive light. 

Instead of shying away talking to other businesses because you think they pose a direct threat to you, think of them in a positive way and how you can help each other out. If a customer comes to me, I can’t perform the job and know of someone that can but don’t let them know, we all lose. 

Next time you talk to a business that lives in the same industry as you are, embrace them and ask them ways that you can help each other out.  

For more tips and tricks for all your home needs visit:
NewEarthVA.com

Or follow us on
Instagram

Thursday, November 6, 2014

Fall / Winter Projects - Walls That Wow!


Since you're stuck inside staring at the walls, why not give them a new look. Adding modern trim work, crown molding and a bold coat of paint can completely change the look of a room without the expense of doing a complete renovation.

Contrary to what many homeowners might believe, you can use paint in your home without opening up every window as long it’s an environmentally friendly and waterborne paint, which has virtually no fumes. Plus, the dryness of the colder months can actually produce faster results.

To really add visual interest to your walls, homeowners could go with a new or dramatic paint color or use painter’s tape to create stripes or patterns.

Wallpaper is making a bit of a comeback thanks to home improvement shows. It can definitely be a do-it-yourself project or you can get professionals to do it.

Replacing interior doors is an affordable way to give your home an updated look versus an expensive remodel.

A resonable investment of $500-$800, can get custom trim and crown molding which can really make a difference in the way that a rom looks. Wider baseboards are something that is pretty trendy right now. 

This is just one of the many projects we will be covering in the next couple of weeks that can be done during the fall and winter seasons. 

For more tips and tricks for all your home needs visit:
NewEarthVA.com

Or follow us on
Instagram

Wednesday, October 29, 2014

How to Clean Blades & Bits - Wood Whisperer

Do you enjoy working on home projects? Ever find that your blades can be a little dull or not perform as well as they used to? This handy video shows us how to clean blades and bits to restore them to their former glory. Just because they are not as sharp as they were when they were first purchased doesn't mean your tool isn't working anymore, it just needs a little tune up!


For more tips and tricks for all your home needs visit:
NewEarthVA.com

Or follow us on
Instagram

Wednesday, October 22, 2014

Find That Leak!

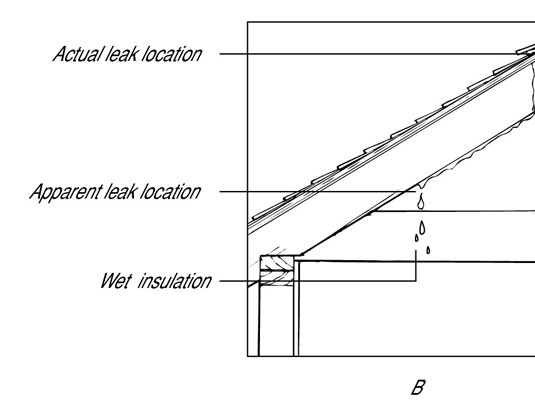
It's been raining a few days now in Richmond, VA and this couldn't really be a better time to check for leaks to see if there your house needs repairs before it's too late! Leaks can be quickly and easily repaired if you catch them when they are still small, this also prevents greater and irreperable damage to your home.

How to Find a Leak in a Roof - For Dummies provides really great tips on how to approach this problem since the leak may not always be where you think it is. 

Make sure to check the attic for leaks if you have one, the tutorial also talks about what to do when it is not actually raining. Bring a hose to your rooftop to check for leaks, pretty clever! You'll probably need someone inside the house if you do decide to run a hose so they can help you spot the place where the roof is leaking, when it is raining you won't have this issue.

Moisture or wet spots are all things that you should be checking for on a regular basis on your ceiling, because sometimes a leak can be so small that it needs some time to show. 

Unless you know what you're doing we don't encourage anyone to get on their roof to fix it although most of the fixes can be done in a couple of hours. You could potentially damage your roof further or you could put yourself in danger. 

For more tips and tricks for all your home needs visit:
NewEarthVA.com

Or follow us on
Instagram

Tuesday, October 21, 2014

Monday, October 20, 2014

Fall Fireplace Maintenance


Winter is coming and you need to make sure that things like insulation and outdoor home maintenance are all taken care of. One of the most important pieces of home maintenance is your fireplace if you have one. This needs to be given proper maintenance or it could cause major damage both inside or outside your house. The most obvious problem is blockage which can cause a fire but here are some general rules and tips to remember when you have a fireplace. 

The first thing to do is to look for build up, there are usually indicators of buildup such as Creosote which is a dark or black substance that surrounds the fireplace opening. It is usually recommended for this to be cleaned at least once a year. Another give away of the fireplace having too much buildup is if not all the smoke is traveling outside. This is an indicator of buildup through the flute leading outside or even blockage on the top portion of the chimney, which is usually covered with a mesh to help prevent animals from building nests or flying in. That mesh can also get clogged with leaves or other obstructions and requires maintenance also.

Choosing the right type of wood such as hardwoods like maple, oak, ash and birch, to burn will also have an impact on residue left behind which in turn can cause less blockage. Make sure that after each few uses that you clean it out throughly, this will help with its efficiency.

And don't forget to check out Five Tips to Make Painting Your Walls Easier

For more tips and tricks for all your home needs visit:
NewEarthVA.com

Or follow us on
Instagram